Luma x20 IPC UI - Config: Image Tile
Here you control how the surveillance feed appears.
Contents:
-
Display Settings - Adjust how the image appears
-
Video/Audio - Manage your streams
-
OSD - On-screen Display: add information to the feed
-
Video Mask - Block out sensitive areas
-
ROI Config - Region of interest: keep your best images where it counts
-
Zoom/Focus - Adjust your motorized camera
Display Settings
Pro Tip: -_Many of these controls can be found in the OvrC interface.
Camera Parameters Tab
The Camera Parameters tab lets you adjust the image. There is no save button; settings are applied dynamically as you work and saved when you exit the tab.
The camera has three separate configuration profiles, one for daytime, one for nighttime, and one generic-use one. Select which one you want to edit at the top right. Whenever you select a profile, the interface automatically adjusts the screen image to show you what it looks like.

In the Video Adjustment section below the screen image, cameras have some or all of the following:
-
Lens Distortion Correction: This setting has the camera try to smooth out the edges of the view.
-
HFR: If you enable High Frame Rate, the camera reboots. After it finishes, you can set the main stream to either 50 or 60 frames per second. This is useful for high-speed environments like cashiers and casinos. Disable this, and the camera reboots, setting the frame rate back to 30.
-
Frequency: If you have lights that flicker in your image, try changing this setting.
-
Infrared Mode: Choose how the camera decides to engage its infrared lighting.
-
Corridor Pattern: Enable this for situations like long hallways. Set the video resolution to 1080P or below, and choose the rotation of the camera image (in 90° increments).
-
Image Mirror: Reverse the image horizontally.
-
Image Flip: Reverse the image vertically.
Below that, PTZ cameras have these additional settings:

-
Focus Limit determines how close the PTZ will focus while tracking.
-
Zoom Display causes the OSD to display the camera's zoom.
-
Zoom Speed and Scan Speed sets the maximum rate at which the PTZ moves.
-
Lens Initialization does a thing.
-
Set North aligns your system geographically. Manually aim your camera north, then push this button. Once this is set, you can access the direction your camera is aiming through the OSD settings.
The right-hand column holds several settings.
Let's start with the sliders, which cover basic image settings.

-
Brightness: Set the brightness level of the camera’s image.
-
Contrast: Set the color difference between the brightest and darkest parts.
-
Hue: Adjust the total color of the image.
-
Saturation: Set the degree of color purity. High saturation makes for vivid color; low makes the image more grayscale.
-
Sharpness: Set the resolution level of the image plane and the sharpness level of the image edge.
-
Noise Reduction: Decrease the visual noise (snow, random pixel errors, etc.). Increasing the value improves the noise reduction effect but reduces image resolution.
-
Defog: Enable this and test the settings to improve visibility in foggy, dusty, smoggy, or rainy environments.
Auto Iris: If your camera is motorized, enable this; otherwise disable it.
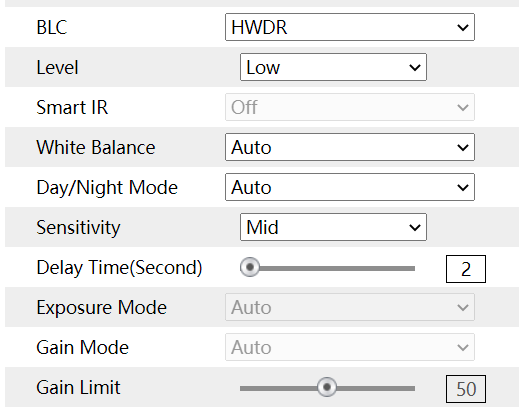
Below, you set how the camera handles difficult lighting situations. These settings vary slightly depending on the BLC option chosen:
-
BLC: Select which backlight compensation option to use:
-
Off: Disables the backlight compensation function. It is the default mode.
-
HWDR: Hardware Wide Dynamic Range adjusts the image when there are both very bright and very dark areas in the field of view. It dims the bright areas and boosts the dark areas. Recording stops for a few seconds when the camera switches into or out of WDR mode.
-
HLC: Highlight Compensation suppresses the brightness of the image’s bright areas and reducing the size of any halo.
-
BLC: Enabling backlight compensation makes dark areas (especially backlit areas) clearly visible.
-
-
Start Time / End Time (HLC selected): These settings tell the camera when to use highlight compensation.
-
Location (BLC selected): This tells the camera which part of the field of view suffers from backlighting.
-
Antiflicker (HWDR not selected): If lights pulsate or flicker in your video feed, test the settings here to try to eliminate it.
-
Level (HWDR selected): Sets the amount of WDR to use. The higher the level, the less contrast there is between the lightest and darkest areas.
-
Smart IR: This function avoids overexposure and underexposure by controlling the brightness of the IR lights according to the ambient light.
-
White Balance Adjust the color temperature according to the environment automatically.
-
Day/Night Mode: This tells the camera when to switch to night mode. Auto lets the camera decide, Day and Night leaves the camera in that mode constantly, and Timing switches according to a set schedule.
-
Daytime / Nighttime (Timing mode selected): Makes the switch according to a set schedule.
-
Sensitivity (Auto mode selected): This sets how readily the camera switches. Higher sensitivity requires less change to make the switch.
-
Delay Time (Seconds) (Auto mode selected): How long a change in light must remain at that light level before the camera switches modes.
-
Exposure Mode (HWDR not selected): If you select Manual, another dropdown appears where you select a fixed value for the digital shutter speed.
-
Gain Mode (HWDR not selected): If you select Manual, this activates the Gain Limit slider below. The higher the value is, the brighter the image is.
The Default button performs a factory reset of just these settings.
The Reset Display Settings button returns all of the above to where they were when you opened this tab. Remember, canges are saved dynamically when you exit this page.
Profile Management Tab
This sets the basis for switching between day and night mode.
-
With Schedule at Full time and Config at Common, then the camera stays in Common mode at all times.
-
With Schedule at Full time and Config at Auto, then the camera switches between day and night mode whenever it senses the need.
-
With Schedule at Timing, you can use the slider to tell the camera when to switch between night mode and day mode.
Click Save before leaving this page.
Video/Audio
This tab manages your streams.
Video Tab
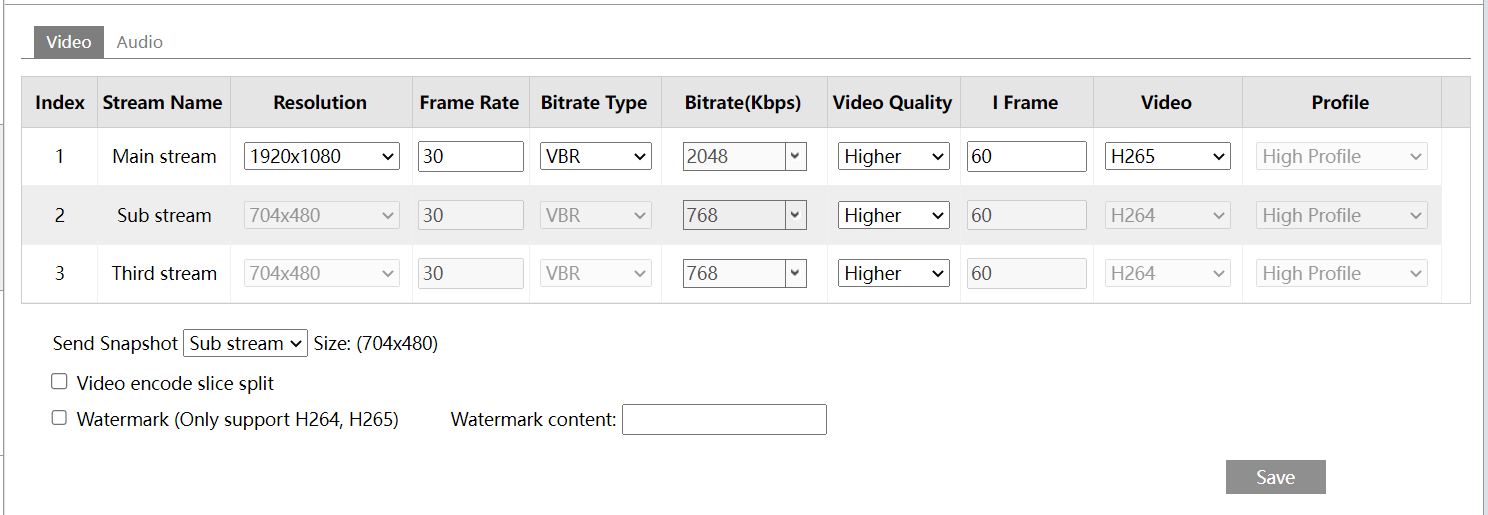
In the table, you set the parameters for each video stream as follows:
-
Resolution: The dimensions of the feed.
-
Frame Rate: Measured in frames per second.
-
Bitrate Type: Choose either CBR (constant bitrate) or VBR (variable bitrate). CBR keeps the volume of the feed constant, no matter how much change occurs in the video. VBR adjusts the bitrate according to scene changes: scenes with little to no movement have a low bitrate, while scenes with a lot of motion have a higher bitrate. WHich option you choose depends on your plan to optimize the network bandwidth load.
-
Bitrate (Kbps): Higher bitrate provides better images at the expense of heavier network traffic.
-
Video Quality: This adjusts the maximum bitrate your camera uses.
-
I Frame Interval: An Iframe is a frame in a video feed that has full resolution for every pixel. Frames after the iframe reduce their bandwidth by just noting changes from the most recent iframe. This setting determines how often the camera uses an iframe. Higher numbers save on bandwidth, but can reduce image quality, especially when there is a lot of motion.
-
Video Compression: We recommend you use H265 as it uses less disk space.
Below the table are several additional options:
-
Send Snapshot: This determines which stream handles the snapshot, and therefore what resolution the snapshot is.
-
Video encode slice split: This feature helps provide a smooth video on low-performance computers..
-
Watermark: If you are using H264 or H265, you can have watermark text appear when playing local recorded video in the search interface. Check the Watermark box to enable it, and enter the desired message in the text box.
Audio Tab
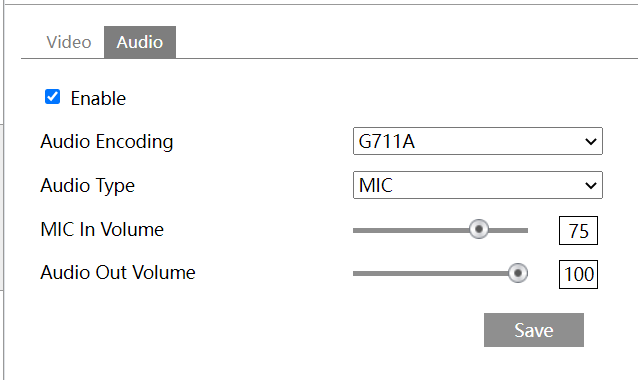
If you Enable audio, the following options appear:
-
Audio Encoding: We recommend G711U
-
Audio Type: Choose whether the input is from a built-in microphone or an external line. Use the built-in microphone whenever possible.
-
MIC/LIN In Volume: Sets the volume of the incoming audio.
-
Audio Out Volume: Controls the volume of an attached speaker.
OSD
Pro Tip: -_You can perform basic OSD functions in OvrC.
This supplies additional OSD options beyond those enabled in OvrC.

To the left is the camera’s video feed showing how all of your OSD options will look.
At the top, select the visibility and format of the date, the content and visibility of the camera name, and the language to use for alerts.
PTZ cameras have the additional options to display the camera's aim (shown as an azimuth from north as set under Image Settings), and the preset number (if the camera is at a preset).
You can also add up to four additional pieces of information, each with one or two lines of text. Click the checkbox to the left to activate the OSD option and enter up to 15 characters in the text box. If desired, you can add a second line of text with 15 more characters.
OSD option 1 can support a graphic instead of text. This graphic must be a JPG that is no more than 200×200.
These OSD options initially appear down the left side of the screen, however you can drag them to any location on the screen.
Video Mask
Your Luma camera supports up to four video masks to preserve privacy, whether it’s a secure item of yours, or a window into a neighbor’s house. Areas covered by a mask are excluded from all recordings.
Click Enable to use a video mask.
Click Draw Area to begin drawing your mask(s). Click and drag across the screen to set the areas to block. Clear erases all masks. Click Stop Draw when you are finished, then Save.
PTZ cameras have a PTZ navigation tool at right for your convenience.
ROI Config
Region of interest (ROI) lets you outline one area in your video that received special attention. The camera uses a higher bitrate for the ROI at the expense of other areas. Thus ROI places the best image quality in the area that you mark as most important.

Click Enable to activate ROI. Then click Draw Area and click and drag across the image. Clear erases that area.
Level determines how much the camera shifts image quality toward the ROI; higher levels mean more detail in the ROI and less in other areas.
Zoom/Focus
Pro Tip: -_This (other than the day/night switch) can be done using OvrC. See Image Settings under OvrC's Camera Configure Tab.
If you have a motorized camera, you can adjust its zoom and focus here.

One-Key Focus lets the camera use its AI to determine the best focus value. It can be adjusted from there.